それ、ラズパイでつくれるよ
それ、ラズパイでつくれるよ——議事録もとれるよ! お酒の席での悩みを解決してみた
飲み会の反省会を引き起こす議事録レシートプリンターを作っていく。
用意するもの
- AS-289R2プリンターシールド
- プリンターシールド用電源ACアダプター(5V4A)
- 感熱紙(今回使用したサーマルプリンターには付属してくる)
- USBマイク(今回使用したものはサンワサプライ製)
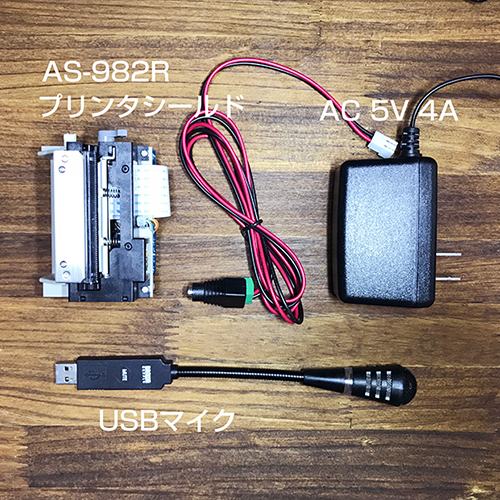
ラズパイとの接続
まずプリンターとマイクをラズパイと接続する。
プリンターシールドの公式ページのラズパイとの接続方法を参考にしてシールド上のジャンパの変更を行い、下画像のようにラズパイと接続する。ラズパイからプリンターにシリアル通信で命令を送ることによって印刷するため、ラズパイのTXとプリンターのRX、お互いのGNDを接続するだけで良い。
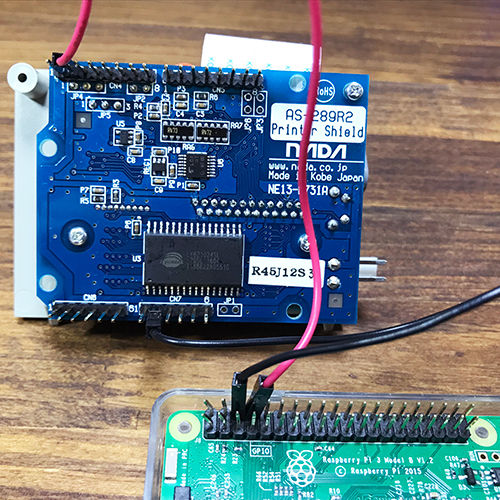 使用するのはラズパイのGPIO6(GND),8(TX)ピンの2つ。
あとはプリンターに感熱紙をセットして、ラズパイにUSBマイクを挿し、プリンターとラズパイそれぞれの電源を入れてやれば、好きに並べて完了だ。
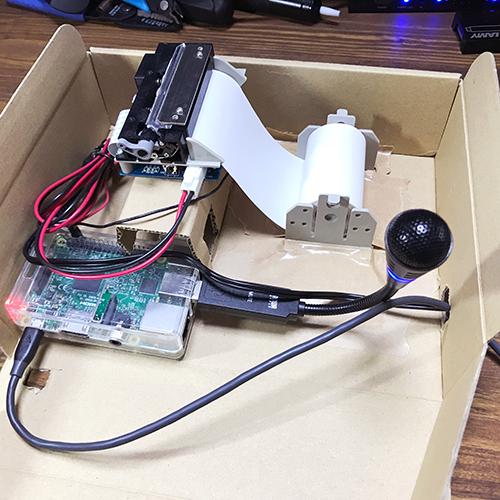 プリンターシールドは自立しないので、なんらかの台が必要になる。
適当な箱に入れてあげれば飲み会に持っていってもいくらか安心できる。
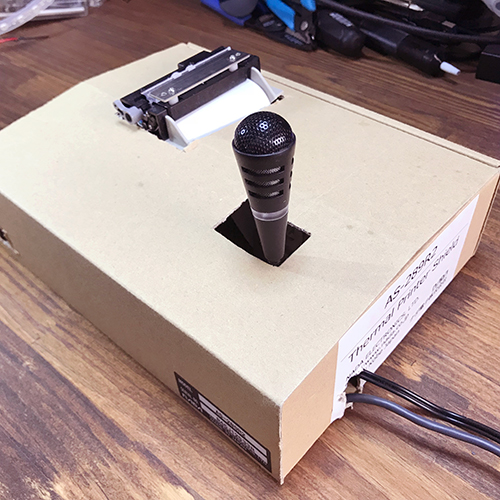 箱はプリンターが配達されたときのものを使った。
サーマルプリンターを使う準備
ここからはソフトウェアの準備。まずはラズパイのアップデート。
$ sudo apt-get update
$ sudo apt-get upgrade
次にプリンターへ命令を送るためのパッケージserialをインストールする。
$ pip install pyserial
それから本体の設定を修正していく。
$ sudo nano /boot/cmdline.txt
で、/boot/cmdline.txt中の「console=serial0,115200」を削除し、

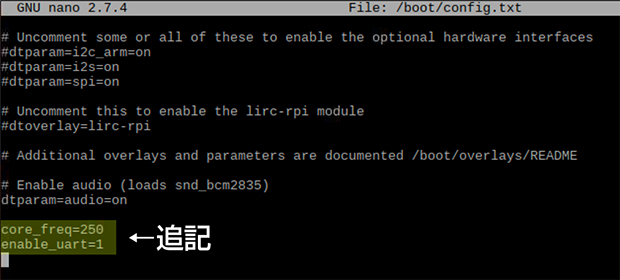
$ sudo nano /boot/config.txt
で、/boot/config.txtに「core_freq=250」と「enable_uart=1」の2行を追記する。その後再起動してプリンターの準備は完了だ。
Google Cloud Speech APIを使う準備
Google Cloud Speech APIを使って音声認識を行うためには、ラズパイへのSDKのインストールとGoogle アカウントの認証が必要になる。Googleアカウントが必須となるので、ない場合は作成する。もちろん無料なので安心。
SDKのインストールは公式のクイックインストールを参考に以下のコマンドを実行する。
$ export CLOUD_SDK_REPO="cloud-sdk-$(lsb_release -c -s)"
$ echo "deb http://packages.cloud.google.com/apt $CLOUD_SDK_REPO main" | sudo tee -a /etc/apt/sources.list.d/google-cloud-sdk.list
$ curl https://packages.cloud.google.com/apt/doc/apt-key.gpg | sudo apt-key add -
$ sudo apt-get update && sudo apt-get install google-cloud-sdk
$ gcloud init
次に公式のドキュメントを参考に認証を行う。
Google Cloud Platformで新しいプロジェクトを作成した後、
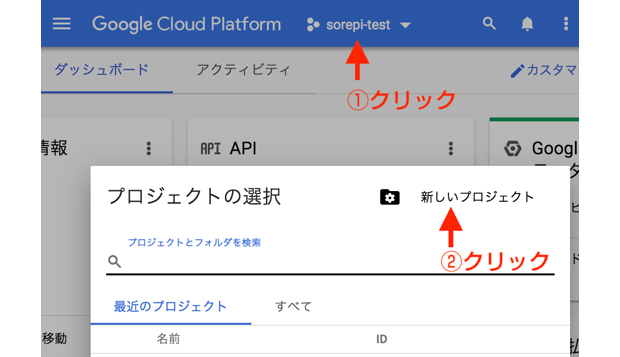
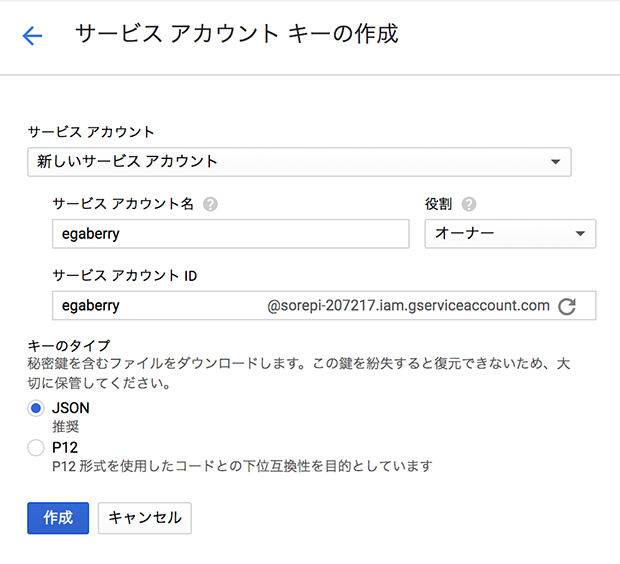
「サービスアカウントキーの作成」ページに移動し、
「サービスアカウント」を「新しいサービスアカウント」に、「サービスアカウント名」に好きな名前を入れ、「役割」を「Project」の中の「オーナー」に設定する。
「作成」ボタンをクリックすると認証キーが含まれたJSONファイルがダウンロードされる。
最後に以下のコマンドを実行して環境変数を設定する。
$ export GOOGLE_APPLICATION_CREDENTIALS="[PATH]"
"[PATH]"はJSONファイルをダウンロードした場所に置き換える。例えば、/home/pi/Downloads/service-account-file.json これで認証は完了だ。最後にGoogle Cloud Speech APIのPythonサンプルをダウンロードして必要なライブラリのダウンロードを行う。以下のコマンドを実行して、APIの準備は完了だ。
$ git clone https://github.com/GoogleCloudPlatform/python-docs-samples.git
$ pip install -r requirements.txt
大きい声を検出する準備
まずUSBマイクを使用するために、
$ sudo nano /etc/modprobe.d/alsa-base.conf
などで /etc/modprobe.d/alsa-base.conf に
options snd slots=snd_usb_audio,snd_bcm2835
options snd_usb_audio index=0
options snd_bcm2835 index=1
を追記する。

Pythonからマイクを使うためのパッケージ pyaudioと音量を監視するためにパッケージ numpyをインストールして完了だ。
$ pip install pyaudio numpy
Pythonで動かしてみる
以下の2つのPythonスクリプトを作成する。
(ここからnomisugiii.py)
import pyaudio
import wave
import numpy as np
from datetime import datetime
import transcribe_sheet as reciept

chunk = 4 * 1024
FORMAT = pyaudio.paInt16
CHANNELS = 1
RATE = 16000
RECORD_SECONDS = 5

# 検出したい音量に合わせて0から1の間で調整する。
threshold = 1

p = pyaudio.PyAudio()

imput_device_index = 0
stream = p.open(format = FORMAT,
    channels = CHANNELS,
    rate = RATE,
    input = True,
    frames_per_buffer = chunk
)

while True:
    data = stream.read(chunk)
    x = np.frombuffer(data, dtype="int16") / 32767
    # print np.max(x)
    if x.max() == threshold:
        print("Recording.")
        filename = datetime.today().strftime("%Y%m%d%H%M%S") + ".wav"
        print(x.max(), filename)

        all = []
        all.append(data)
        for i in range(0, int(RATE / chunk * int(RECORD_SECONDS))):
            data = stream.read(chunk)
            all.append(data)
        data = b''.join(all)

        out = wave.open(filename,'w')
        out.setnchannels(CHANNELS)
        out.setsampwidth(2)
        out.setframerate(RATE)
        out.writeframes(data)
        out.close()

        print("Saved.")

        reciept.transcribe_file(filename)


stream.close()
p.terminate()
(ここまでnomisugiii.py)
(ここからtrascribe_sheet.py)
# [START import_libraries]
import argparse
import io
import serial
from datetime import datetime
# [END import_libraries]

ser = serial.Serial("/dev/ttyS0", baudrate = 9600, timeout = 2)

# [START def_sheetdasu レシートを出力するための関数]
def sheetdasu(ohgoe):
    ser.write(chr(0x12)) # 0x12
    ser.write(chr(0x53)) # 0x53
    ser.write(chr(0x01)) # 0x00 or 01
    ser.write(chr(0x1B)) # 0x1B
    ser.write(chr(0x6C)) # 0x6C
    ser.write(chr(0x06)) # 0x00 - 0x2F
    ser.write("新しいものづくりがわかるメディア\r\r")
    ser.write(chr(0x12)) # 0x12
    ser.write(chr(0x53)) # 0x53
    ser.write(chr(0x00)) # 0x00 or 01

    ser.write(chr(0x1C)) # 0x1C
    ser.write(chr(0x57)) # 0x57
    ser.write(chr(0x01)) # 0x00 or 01
    ser.write(chr(0x1B)) # 0x1B
    ser.write(chr(0x6C)) # 0x6C
    ser.write(chr(0x0C)) # 0x00 - 0x2F
    ser.write("fabcross\r")
    ser.write(chr(0x1C)) # 0x1C
    ser.write(chr(0x57)) # 0x57
    ser.write(chr(0x00)) # 0x00 or 01

    ser.write("\r");  # Line Feed
    date = datetime.today().strftime("%Y年%m月%d日 %H:%M")
    ser.write(date)
    ser.write("\r")

    ser.write(chr(0x1B)) # 0x1B
    ser.write(chr(0x6C)) # 0x6C
    ser.write(chr(0x26)) # 0x00 - 0x2F
    ser.write("担:01\r\r\r\r")

    ser.write(chr(0x1B)) # 0x1B
    ser.write(chr(0x6C)) # 0x6C
    ser.write(chr(0x28)) # 0x00 - 0x2F
    ser.write("様\r")

    ser.write("-----------------------------\r")
    ser.write("大きい声        数量 1\r\r\r")

    ser.write(chr(0x1B)) # 0x1B
    ser.write(chr(0x57)) # 0x57
    ser.write(chr(0x01)) # 0x00 or 01
    ser.write("内容\r\r")
    ser.write(chr(0x1B)) # 0x1B
    ser.write(chr(0x57)) # 0x57
    ser.write(chr(0x00)) # 0x00 or 01

    ser.write(chr(0x1C)) # 0x1C
    ser.write(chr(0x57)) # 0x57
    ser.write(chr(0x01)) # 0x00 or 01
    ser.write(ohgoe)
    ser.write(chr(0x1C)) # 0x1C
    ser.write(chr(0x57)) # 0x57
    ser.write(chr(0x00)) # 0x00 or 01

    ser.write("\r(内うるさい度    100)\r\r\r")

    ser.write(chr(0x1B)) # 0x1B
    ser.write(chr(0x68)) # 0x68
    ser.write(chr(0x00)) # 0x00 or 01 or 02 or 03
    ser.write(chr(0x12)) # 0x12
    ser.write(chr(0x53)) # 0x53
    ser.write(chr(0x01)) # 0x00 or 01
    ser.write(chr(0x1B)) # 0x1B
    ser.write(chr(0x6C)) # 0x6C
    ser.write(chr(0x1D)) # 0x00 - 0x2F
    ser.write("レシート No.012\r")
    ser.write(chr(0x1B)) # 0x1B
    ser.write(chr(0x68)) # 0x68
    ser.write(chr(0x01)) # 0x00 or 01 or 02 or 03
    ser.write(chr(0x12)) # 0x12
    ser.write(chr(0x53)) # 0x53
    ser.write(chr(0x00)) # 0x00 or 01

    ser.write("-----------------------------\r")

    ser.write(chr(0x1B)) # 0x1B
    ser.write(chr(0x6C)) # 0x6C
    ser.write(chr(0x04)) # 0x00 - 0x2F
    ser.write("》》》 記事見てね!《《《\r")

    ser.write(chr(0x1B)) # 0x1B
    ser.write(chr(0x4A)) # 0x4A
    ser.write(chr(0x10)) # 0xXX
    ser.write("記事はこちら!!\r")

    ser.write(chr(0x1B)) # 0x1B
    ser.write(chr(0x68)) # 0x68
    ser.write(chr(0x00)) # 0x00 or 01 or 02 or 03
    ser.write("\rhttps://fabcross.jp/list/series/sorepi/\r\r")
    ser.write(chr(0x1B)) # 0x1B
    ser.write(chr(0x68)) # 0x68
    ser.write(chr(0x01)) # 0x00 or 01 or 02 or 03

    ser.write("[それ、ラズパイでつくれるよ]\rで検索!\r")
    ser.write("\r\r");  # Line Feed

    # QRcode Print
    ser.write(chr(0x1D))
    ser.write(chr(0x79))
    ser.write(chr(0x01))
    ser.write(chr(0x1D))
    ser.write(chr(0x78))
    ser.write(chr(0x4C))
    ser.write(chr(0x27))
    ser.write("https://fabcross.jp/list/series/sorepi/")   # DATA
    ser.write("\r\r\r\r\r\r");  # Line Feed
# [END def_sheetdasu]

# [START def_transcribe_file]
def transcribe_file(speech_file):
    """Transcribe the given audio file."""
    from google.cloud import speech
    from google.cloud.speech import enums
    from google.cloud.speech import types
    client = speech.SpeechClient()

    # [START migration_sync_request]
    # [START migration_audio_config_file]
    with io.open(speech_file, 'rb') as audio_file:
        content = audio_file.read()

    audio = types.RecognitionAudio(content=content)
    config = types.RecognitionConfig(
        encoding=enums.RecognitionConfig.AudioEncoding.LINEAR16,
        sample_rate_hertz=16000,
        language_code='ja-JP')
    # [END migration_audio_config_file]

    # [START migration_sync_response]
    response = client.recognize(config, audio)
    # [END migration_sync_request]
    # Each result is for a consecutive portion of the audio. Iterate through
    # them to get the transcripts for the entire audio file.
    for result in response.results:
        # The first alternative is the most likely one for this portion.
        print(u'Transcript: {}'.format(result.alternatives[0].transcript))
        encoded = (result.alternatives[0].transcript).encode('utf-8')
        sheetdasu(encoded)
    # [END migration_sync_response]
# [END def_transcribe_file]


if __name__ == '__main__':
    parser = argparse.ArgumentParser(
        description=__doc__,
        formatter_class=argparse.RawDescriptionHelpFormatter)
    parser.add_argument(
        'path', help='File or GCS path for audio file to be recognized')
    args = parser.parse_args()
    # if args.path.startswith('gs://'):
        # transcribe_gcs(args.path)
    # else:
    transcribe_file(args.path)
(ここまでtranscribe_sheet.py)
nomisugiii.pyの冒頭のimport transcribe_sheet as recieptという部分で、自分で作成したスクリプトであるtranscribe_sheet.pyに記述されている関数を呼び出せるようにしている。スクリプトはGithubにアップロードされているので、以下のコマンドでコピーできる。
$ git clone https://github.com/kazme-egawa/otashi_pi.git
以下のコマンドを実行すると
$ python nomisugiii.py
閾値以上の音量をマイクが拾うと自動的に録音し、Google Cloud Speech APIを使って文字に起こし、レシートとして出力してくれる。検出したい音量に合わせて閾値を0から1の間で調整する必要がある。
今回は、ラズパイを使って飲み会でついつい声が大きくなってしまうのを抑制する機器を作った。話した内容がレシートで出てくること自体に楽しさがあるのでぜひ試してみてほしい。
※このコーナーでは、みなさんの「それ、ラズパイでつくれるよ」をお待ちしています。問い合わせフォームからドシドシご応募ください。
参考
- AS-289R2プリンターのクイックスタート (http://www.nada.co.jp/as289r2/start.html)
- Pythonで大きな音を検出する方法 (https://qiita.com/mix_dvd/items/dc53926b83a9529876f7)
- pyaudioのインストールで困った時は (https://qiita.com/musaprg/items/34c4c1e0e9eb8e8cc5a1)
- Google Cloud APIの認証方法 (https://cloud.google.com/docs/authentication/getting-started#auth-cloud-implicit-python)
- Raspberry PiでのGoogle Cloud Speech APIを使い方 (https://qiita.com/mayfair/items/92ae1d4d7c93a1355b02)
- Google Cloud SDKのクイックスタート (https://cloud.google.com/sdk/docs/quickstart-debian-ubuntu)
- 取材協力:塩ホルモンさとう(東京都中野区中野2丁目29−1) https://www.facebook.com/shiohorumonsato/
- ラズベリー画像の使用元:https://www.vecteezy.com/vector-art/146197-free-berries-line-icon-vector
